I don’t think I know a single Android developer who’s not stoked about Reactive Programming with RxAndroid right now. I totally dig the idea of subscribing to events emitted by my applications and be able to react accordingly.
With Rx you have Observables and Observers. Observables are expected to emit values. While Observers watch Observables by subscribing to them.
Observing a button for example would look like this:
Subscription buttonSub = RxView.clicks(mLoginButton).subscribe(aVoid -> {
  //handle on click here
});
But let’s look at a more real-life example.
Requirements
I would like to have a reactive login form that updates itself according to the values entered. Such that:

- It only shows a login button once the username and password have been validated
- It lets me know that values I entered for each field are correct so I can start working on the next field.
Our tools
- I’ll be using Android Studio here, but you should feel free to use whatever floats your boat.
- The libraries ButterKnife , RxBinding & RetroLambda. You can see the versions I used here.
The form
You can download the entire project from my GitHub repo, or follow this tutorial.
Start by creating a new project with an Empty Activity, and once that’s completed open activity_main.xml.
I used the Design Support Library to create my form.
<ScrollView
    xmlns:android="http://schemas.android.com/apk/res/android"
    android:layout_width="fill_parent"
    android:layout_height="fill_parent"
    android:fitsSystemWindows="true"
    xmlns:tools="http://schemas.android.com/tools"
    tools:context=".MainActivity"
    android:background="@color/colorPrimary">
    <LinearLayout
        android:orientation="vertical"
        android:layout_width="match_parent"
        android:layout_height="wrap_content"
        android:paddingTop="56dp"
        android:paddingLeft="24dp"
        android:paddingRight="24dp">

        <ImageView android:src="@drawable/selfie"
            android:layout_width="wrap_content"
            android:layout_height="72dp"
            android:layout_marginBottom="24dp"
            android:layout_gravity="center_horizontal" />

            <!-- Login Label -->
            <android.support.design.widget.TextInputLayout
                android:layout_width="match_parent"
                android:layout_height="wrap_content"
                android:layout_marginTop="8dp"
                android:layout_marginBottom="8dp">
                <EditText android:id="@+id/login_et"
                    android:layout_width="match_parent"
                    android:layout_height="wrap_content"
                    android:hint="Email" />
            </android.support.design.widget.TextInputLayout>

            <!-- Password Label -->
            <android.support.design.widget.TextInputLayout
                android:layout_width="match_parent"
                android:layout_height="wrap_content"
                android:layout_marginTop="8dp"
                android:layout_marginBottom="8dp">
                <EditText android:id="@+id/password_et"
                    android:layout_width="match_parent"
                    android:layout_height="wrap_content"
                    android:inputType="text|textVisiblePassword"
                    android:hint="Password"/>
            </android.support.design.widget.TextInputLayout>

            <android.support.v7.widget.AppCompatButton
                android:id="@+id/login_bt"
                android:layout_width="fill_parent"
                android:layout_height="wrap_content"
                android:layout_marginTop="24dp"
                android:layout_marginBottom="24dp"
                android:padding="12dp"
                android:text="Login"/>
        </LinearLayout>
</ScrollView>
Once that form is created, we will add some references to it at the top of our MainActivity class.
public class MainActivity extends AppCompatActivity {

    @BindView(R.id.login_et)
    EditText mLogin;

    @BindView(R.id.password_et)
    EditText mPassword;

    @BindView(R.id.login_bt)
    Button mLoginButton;

    @BindDrawable(android.R.drawable.presence_busy)
    Drawable mInvalidField;

    @BindDrawable(android.R.drawable.presence_online)
    Drawable mValidField;
We’re using ButterKnife here to bind the widgets to our layout. Inside the onCreate method we need to make sure to initialise ButterKnife.
protected void onCreate(Bundle savedInstanceState) {
        super.onCreate(savedInstanceState);
        setContentView(R.layout.activity_main);

        ButterKnife.bind(this);
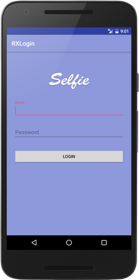
 Give that a spin and you should see our form, and really nothing else.
But now we know our form is working and all the fields are displaying and bound correctly. You will notice that if you try to do anything with this form though, no validation kicks in.
Also, the login button is displaying, and one of our initial requirements was that the login button only displays once we have validated that the data entered in the form is in the format we expect.
We will add this functionality now by adding three new Observables to our class and subscribing to them to check for when values change and become valid.
Validation
I want to validate that the username is in fact an email address. The easiest way we can do this is by using a regular expression. The EmailRegex website has a good one we can use here. So we will just copy that and create a new method called isValidLogin that returns a boolean to indicate whether the email is valid or not.
private boolean isValidLogin(CharSequence value) {
    return value.toString().matches("(?:[a-z0-9!#$%'*+/=?^_`{|}~-]+(?:\\.[a-z0-9!#$%'*+/=?^_`{|}~-]+)*|\"(?:[\\x01-\\x08\\x0b\\x0c\\x0e-\\x1f\\x21\\x23-\\x5b\\x5d-\\x7f]|\\\\[\\x01-\\x09\\x0b\\x0c\\x0e-\\x7f])*\")@(?:(?:[a-z0-9](?:[a-z0-9-]*[a-z0-9])?\\.)+[a-z0-9](?:[a-z0-9-]*[a-z0-9])?|\\[(?:(?:25[0-5]|2[0-4][0-9]|[01]?[0-9][0-9]?)\\.){3}(?:25[0-5]|2[0-4][0-9]|[01]?[0-9][0-9]?|[a-z0-9-]*[a-z0-9]:(?:[\\x01-\\x08\\x0b\\x0c\\x0e-\\x1f\\x21-\\x5a\\x53-\\x7f]|\\\\[\\x01-\\x09\\x0b\\x0c\\x0e-\\x7f])+)\\])");
}
You could change that to fit anything you need. In my first go at this I was only checking whether the value had 5 characters or more.
Next we will create similar method to check whether the password is valid according to our requirements. I kept this simple and only checked that the password is anything between 4 and 8 characters and that it has at least one number.
private boolean isValidPassword(CharSequence value) {
    return value.toString().matches("^(?=.*\\d).{4,8}$");
}
Again, feel free to modify this to do whatever you want it to do. There are regular expression recipes all over the internet so just search for something that works for you.
Putting it all together
We need to start using these validation methods with our code, so go ahead and create three new Observables in the onCreate method.
ButterKnife.bind(this);

Observable<CharSequence> loginObservable = RxTextView.textChanges(mLogin);

Observable<CharSequence> passwordObservable = RxTextView.textChanges(mPassword);

Observable<Boolean> combinedObservables = Observable.combineLatest(loginObservable, passwordObservable, (o1, o2) -> isValidLogin(o1) && isValidPassword(o2));
The first and the second one are really simple and use the RxBinding library to check for text changes on the form field. The third one is the most interesting in my option, as it combines the latest vales emitted by each one of the previous Observables and then checks to see whether their values are considered to be valid according to our validation rules.
But we’re just emitting values here, and don’t really have anything watching for these value changes and reacting to it.
We will change our code to add subscribers (Observers) to each one of our Observables.
ButterKnife.bind(this);

Observable<CharSequence> loginObservable = RxTextView.textChanges(mLogin);
loginObservable
        .map(this::isValidLogin)
        .subscribe(isValid -> mLogin.setCompoundDrawablesRelativeWithIntrinsicBounds(null,null, (isValid ? mValidField : mInvalidField), null));

Observable<CharSequence> passwordObservable = RxTextView.textChanges(mPassword);
passwordObservable
        .map(this::isValidPassword)
        .subscribe(isValid -> mPassword.setCompoundDrawablesRelativeWithIntrinsicBounds(null,null, (isValid ? mValidField : mInvalidField), null));

Observable<Boolean> combinedObservables = Observable.combineLatest(loginObservable, passwordObservable, (o1, o2) -> isValidLogin(o1) && isValidPassword(o2));
combinedObservables.subscribe(isVisible -> mLoginButton.setVisibility(isVisible ? View.VISIBLE : View.GONE));
The first and second Observers are similar and will change the drawable in the field to a green dot when the values entered are valid.
The third Observer will change the button to visible once the values are correct, and hide it if the values become incorrect again.
React to all the things
Reactive programming is a lot of fun, and once you get started with it you will want to find an excuse to subscribe to every one of your data streams. Bet you think our little form works way better now than before.
Donn Felker wrote a really good Rx tutorial here that goes through a lot of the basics when getting started with RxAndroid. The Operators page in the Reactive.io website is also a great resource to help you understanding what all the operators do.
Have fun!

