At work, we’ve decided to start using enterprise queuing applications for ease of communication between our ColdFusion and .Net projects.
For those who don’t know how queues work, if I had to summarize it I would say it’s like a database that stores all the messages sent from diverse systems (even in different clusters), and awaits until a consumer (queue subscriber) picks them up.
Queues accept pretty much any kind of string you throw at them, so you could for example give it JSON or XML if you wanted to store anything a bit more complex than an ID for example.
You then write specific consumers that only listen to certain queues, and once they have received and acknowledged the message, they then move on to pick up the next item in the queue.
The queues we will be seeing in this post are FIFO type queues, which means the first item you chuck into the queue, will be theoretically the first to come out. I say “theoretically” because you could tinker with this and prioritise the order your queue serves stuff.
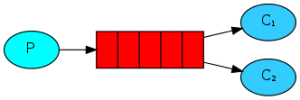
A simple queue with multiple consumers could be represented the following way:

What is important to notice here, is that items will be picked up on a round-robin fashion, meaning no one item could be picked up by two consumers, and no one consumer would be "greedy" and pick up more items than the others.
To illustrate this, I will use an email queue as an example. So image the following scenario:
- You have an emailing system, and all it does is… well send emails.
- Your online store sends a confirmation email to every client after they have purchased an item. And this step is important, as it provides the customer with information about their purchase.
- Your application does not need to know it sends emails, therefore all it needs to do is say: “Hey, someone’s made an order and I’ve processed it”
What the last point it trying to say, is that an application doesn’t necessarily need to have things that aren’t related to its main purpose (selling products in this case).

I will first start by pointing you towards where to start. I won’t get into too many details about how to setup everything, since the guys over at RabbitMQ have done a pretty good job when exemplifying every all possible installations that might suit your needs here.
RabbitMQ is the enterprise queue application we will be using for this blog post, but after analysing other products, I came to the conclusion that they all work pretty much the same way. Rabbit is only the one I chose as it ticks all the boxes for my current requirements and is also open source, which in my opinion makes all the difference when getting support and updates.
We should start by making sure RabbitMQ service is started which in most cases can be done through the click of a button on windows, or by issuing a simple rabbitmqctl start on *nix servers.
RabbitMQ’s service can run on multiple clusters, and is very scalable, so you could potentially have multiple consumers listening to a very busy queue without running into the risk of processing the same item more than once. It’s also worth mentioning that clustering is made very easy, and can be accomplished through only a few single steps.
We will start by implementing a simple message producer that adds a message to a queue we define. Here is how it goes:
//Declare queue name. This can be anything you like
string QueueName = "QTransactions";
// Create a new connection factory for the queue
var factory = new ConnectionFactory();

// Because Rabbit is installed locally, we can run it on localhost
factory.HostName = "127.0.0.1";
using (IConnection connection = factory.CreateConnection())
using (IModel channel = connection.CreateModel())
{
    // mark all messages as persistent
    const bool durable = true;
    channel.QueueDeclare(QueueName, durable, false, false, null);

    // Set delivery mode (1 = non Persistent | 2 = Persistent)
    IBasicProperties props = channel.CreateBasicProperties();
    props.DeliveryMode = 2;
    string msg = args[0];
    byte[] body = System.Text.Encoding.UTF8.GetBytes(msg);
    channel.BasicPublish("", QueueName, props, body);
    Console.WriteLine(" [x] Sent {0}", msg);
}
Notice on the code above, I am simply declaring what queue I would like to use, creating a connection with it, setting some properties and publish my message into the queue.
A few things to keep in mind are:
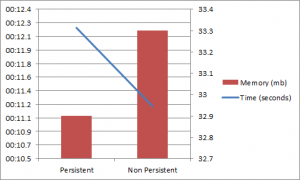
- There can be two kinds of delivery mode. Persistent and non-persistent. Where persistent messages will be kept even if Rabbit’s service is restarted. This is because when you set a message to be persistent, it is stored in disk. Non-persistent messages will be lost if the service is restarted. When benchmarking persistent against non-persistent messages (with the message of the message
{"product":"1552,1559,1683","order":8445689,"email":"john@doe.com"}to check what the overhead was, I observed the following:

- Messages have to be passed in to RabbitMQ as byte arrays, so you can’t simply bung any old string into the queue, and expect it will work.
And now, as I mentioned before, in my system, items will potentially be added via ColdFusion, so they can be processed via our .Net application. Here is the equivalent code to the one above:
<cfscript>
	QueueName = "QTransactions";
	durable = true;
	loadPaths = arrayNew(1);
	loadPaths[1] = expandPath("lib/rabbitmq-java-client-bin-2.8.4/rabbitmq-client.jar");
	// load jars
	javaLoader = createObject("component", "lib.javaloader.JavaLoader").init(loadPaths);
	// Create factory
	factory = javaloader.create("com.rabbitmq.client.ConnectionFactory").init();
	factory.setHost("127.0.0.1");
	// Create properties
	messageProperties = javaloader.create("com.rabbitmq.client.MessageProperties").init();
	props = messageProperties.PERSISTENT_TEXT_PLAIN;
	// Connect
	connection = factory.newConnection();
	channel = connection.createChannel();
	// Declare queue
	channel.QueueDeclare(QueueName, durable, false, false, createJavaNull());
	// Create string
	objStringByteArray = createByteArray("this is my CF message 12345");
	// Publish
	try{
		channel.basicPublish("", QueueName, props, objStringByteArray);
	}
	finally{
		// Close connection
		channel.close();
		connection.close();
	}
</cfscript>
And a few things to note here:
- I am loading the jar file via Mark Mandel’s Java Loader. I know ColdFusion 10 has this functionality out of the box, but I still haven’t upgraded my local development box. Besides, I think the Java Loader is a pretty sweet implementation that lets me do lots of cool things.
- I create my connection factory and set hosts the exact same way bas done above.
- ColdFusion does not have a true null that it can pass on, for that reason I had to implement my own. The way I did that, was to create an empty Vector and use it. That returns a true Java null. Bit of a hack I know, but it does the job quite nicely.
// Returns a Java null from ColdFusion
function createJavaNull(){
  var vector = CreateObject("java", "java.util.Vector");
  vector.setSize(1);
  return vector.get(0);
}
UPDATE As pointed out in the comments by Henry Ho, you could just replace this with the code below to get the same results as long as your version of ColdFusion is above 7:
// Returns a Java null from ColdFusion
function createJavaNull(){
  return javacast("null","");
}
- The other thing I had to do, was make sure I could actually pass a byte array to the queue. ColdFusion also does not do it natively. However, its closest buddy Java does it. So fear not, the following bit of code will do that exact thing by turning a string into a Java string, and then calling the method getBytes()from it, which will return a byte array. Again, but of a hack, but quite graceful.
// Converts a ColdFusion string in a java byte array
function createByteArray(string){
	var objString = createObject("Java", "java.lang.String").init(JavaCast("string", string));
	return objString.getBytes();
}
With that, we then should end up with a queue called QTransactions that has one item on it.
RabbitMQ provides you with a very nice plugin that lets you see what you currently have in your queues, as well as letting you add items manually.
We will now write a new program that will only listen to our queue (QTransactions) and processes message contents.
// Declare the queue name
string QueueName = "QTransactions";
// Create a new connection factory for the queue
var factory = new ConnectionFactory();

// Because Rabbit is installed locally, we can run it on localhost
factory.HostName = "127.0.0.1";
using (var connection = factory.CreateConnection())
using (var channel = connection.CreateModel())
{

    // When reading from a persistent queue, you need to tell that to your consumer
    const bool durable = true;
    channel.QueueDeclare(QueueName, durable, false, false, null);

    var consumer = new QueueingBasicConsumer(channel);

    // turn auto acknowledge off so we can do it manually. This is so we don't remove items from the queue until we're perfectly happy
    const bool autoAck = false;
    channel.BasicConsume(QueueName, autoAck, consumer);

    System.Console.WriteLine(" [*] Waiting for messages." +
                                "To exit press CTRL+C");
    while (true)
    {
        var ea = (BasicDeliverEventArgs)consumer.Queue.Dequeue();

        byte[] body = ea.Body;
        string message = System.Text.Encoding.UTF8.GetString(body);
        System.Console.WriteLine(" [x] Processing {0}", message);

        // Acknowledge message received and processed
        System.Console.WriteLine(" Processed ", message);
        channel.BasicAck(ea.DeliveryTag, false);
    }
}
As you can see, we’ve pretty much done the same thing here.
- We’ve declared our queue.
- Then opened a connection factory and created a connection with it.
- When we told Rabbit from which queue we wanted to read from, we also had to tell it that this queue is a persistent queue. Had we skipped this step, RabbitMQ would throw an exception as we’re trying to read from something we’re not completely certain.
- We then initiate an infinite loop. That is so our application is always trying to listen to messages
- We read messages the exact same way we write them (i.e. they’re byte arrays)
- Last but not least, we provide our queue with acknowledgement. This step is pretty important, as a queue will only let an item go if it receives an acknowledgement message.
To extend a bit on acknowledges, I think it’s worth mentioning that had you set the autoack to be true when you created your consumer, there wouldn’t be a need to acknowledge messages manually. You will probably be asking yourself why I have turned it off.
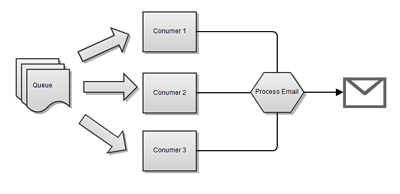
Going back to my use case, remember when I said sending emails was pretty important as it provides customers with information about their purchase? Well the word important makes all the difference here, since we need to guarantee that customers will at least be sent an email (we will ignore undelivered emails here). SO imagine the following scenario:

As you will have noticed, multiple consumers can take one item at a time from the queue. When it comes to processing it, you could for example be querying the database in order to get more details about the purchase so you can build the email. But what happens if your database returns a connection reset at this exact time? Well, if you used autoack, your message has long gone from the queue, and your only option would be to wrap it on a try-catch block and re-queue it.
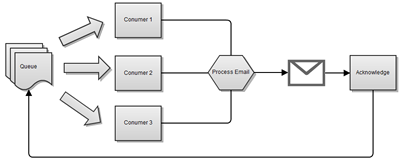
Or, you could simply turn autoack off, and acknowledge the message yourself. That way, you would only “tell” the queue to let go of the item once you were happy that it can. Your flow without autoack would the look like this:

And with that we have managed to add items into a queue, and read them back by making sure nothing is lost should we have an exception or a service failure.
I have uploaded the full C# source code for this article into GitHub. It is also a full working example that will run by adding and retrieving messages into and from a queue. All you need to do is get RabbitMQ installed.

